Tuesday, 27 May 2025

Presenting the project: Scientific Poster


It is the moment to present your project. It is very common to use a poster with all the details to explain the whole project.

πŸ“Some help to do the Poster with MS office PowerPoint 365:

Steps: 
  1. Prepare all information you are going to include on your poster: theoretical fundaments, charts, pictures, graphs, text (tittle, objective of the work, process, conclusions) 
  2. Include the basic paragraphs of a scientific poster [ content πŸ‘‡]
  3. You can use PowerPoint templates from this website  or this another one 
πŸ‘‰Here you have the content

Introduction:

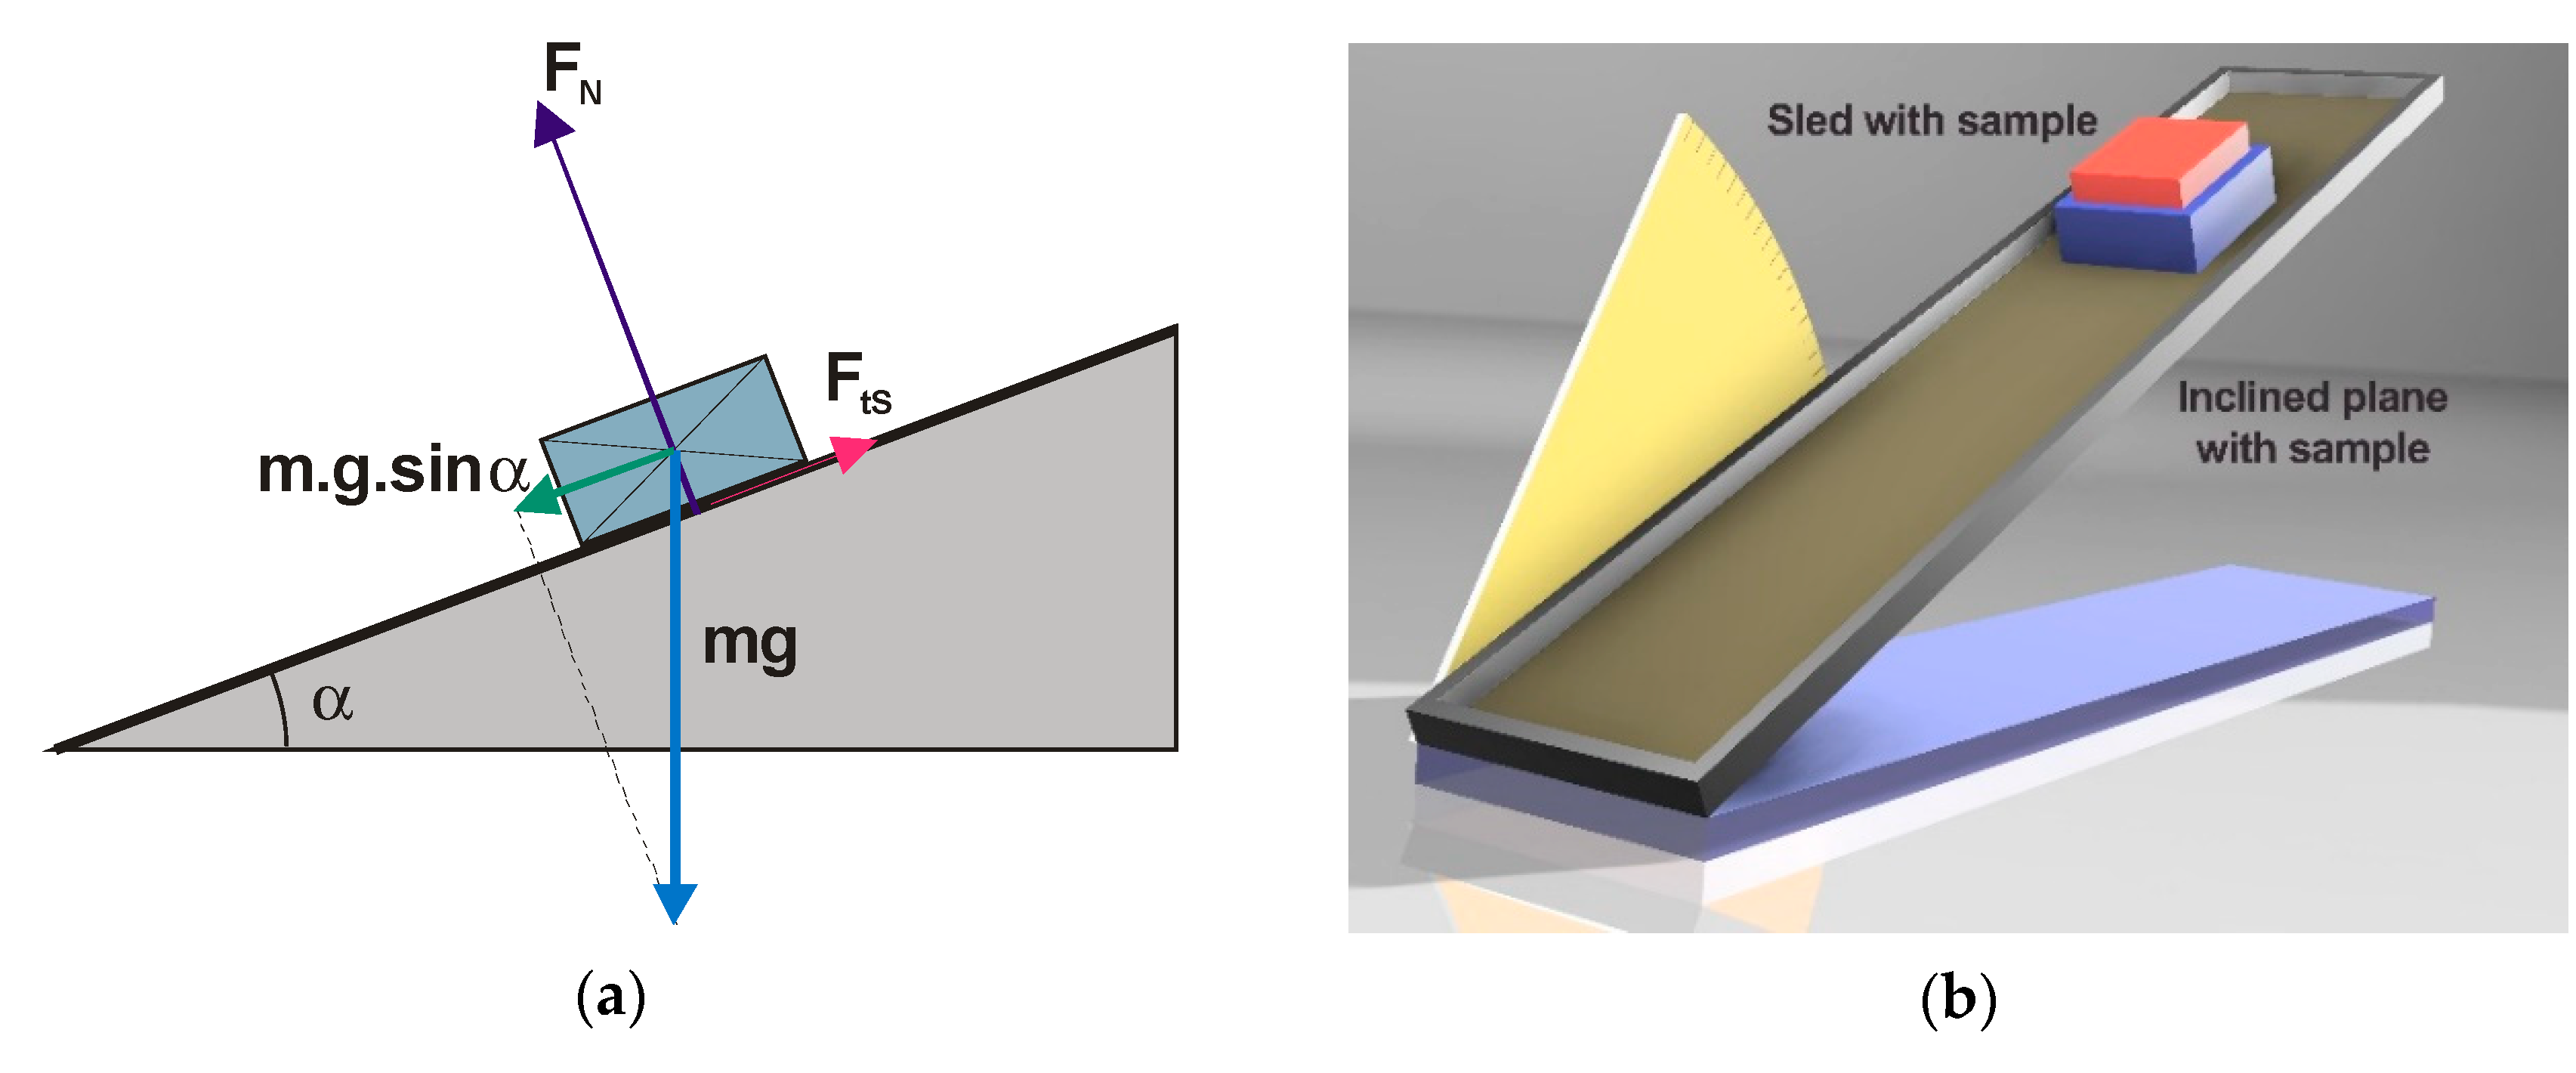
    Explain first what is the objective of the work: Figure out the coefficient of friction between to srufaces using experimental measurements with the mobile accelerometer... 
    Explain what the activity is about: Use the inclined plane to produce the movement and take measures of accelaration, angles… 
        Describe the process you have followed and all the programs (Phyphox, excel) you have used to do it..
    Find information and explain briefly about the main concepts you are going to work with:  Newton´s second law, coefficient of kinetic and static friction, incline plane movement, acceleration, mobile accelerometer,...

Research:
  • Show here the whole process step by step, showing the mobile data, the excel graphs, the explanation of everything you have found… The table of data...
  • Describe the experiments
  • You can include here information about the Charts, how to find the relevant information, the experimental measures you have taken… 
Conclusions:

  • Analyze the results and draw conclusions 
  • Discuss the results, possible mistakes, ...
  • Explain what you have found using the researching work and discuss if it is what you expected…
  • Do a proposal for another researching work to go further or redesign the experiment if you think that could be better … 


πŸ‘€ Watch these videos to learn how to use the templates with the PowerPoint 365. They are posters with different projects and content so pay attention only to the poster edition


First part of 3:


2 of 3:


 The last part:


Thursday, 10 April 2025

Coefficient of static friction: Experimental Measurement

 This is an experimental project where you are going to check some of the conceps you learnt in Phisics: The inclined plane movement.


You will calculate the coefficient of friction between to surfaces using the mobile phone as your instrument to take measurements... sheet with the basics

Here you have three videos that explain the activity:

1st video: The basics about Physic concepts applied & the use of the phyphox mobile app


 2nd video: Exporting the data to exel, reading the data and understanding the information given


 3rd video: Calculating the coefficient with several experiments


Coefficient of kinetic friction: Experimental measurement

 Let`s analyse now the experiment and conclusions to measure the cofficient of friction when the object is already moving on an inclned plane.


Here you have a sheet that explains the basic physic fundaments to understand the activity and some videos that may help you analysing the data given by the phyphox application, using excel.


πŸ‘€Watch this second video and learn how to use excel to analyse all the exported data by the app phyphox.


And how to do the final calculation using the tendence line values is shown is this video πŸ‘€:


Thursday, 13 March 2025

Using the mobile like a Physics Laboratoty: Angles

 This is our new project!!

You are going to use your mobile phone sensors to take measurements and do Physics calculations.

To do so you will use the android app phyphox


Let us start with trigonometry measurements: activity phyphox01

Here you have the way to calculate the angle using your mobile accelerometersheet1

  1. Install the app on your mobile
  2. Take the measure of different angles
  3. build an excel spreadsheet to do the calculations  (use the excel in office365 to work together with your partner by sharing the same document)
  4. Organize the information on the spreadsheet so that to be printed 
  5. Upload both xlsx and pdf 
  6. Publish an article on your blog explaining the activity and results 


Wednesday, 12 February 2025

Filters and colours with Gimp

 
This is an article prepared to help you learning how to do a mosaic of different versions of the same photo or several photos like the one you have here

Project instructions: here

The versions of the photos are going to be done using Gimp filters or just the edition of colour that the program offers. 

Find some photos here

Watch the videos to learn about it.

First part: Preparing the canvas and calculating the resolution of each of the pictures. Of course, the resolution of the single pictures is the division of the total by the number of pictures by line. Since in the example there are three pictures per line, then you have to divide by 3.


second part: Examples of editing the colection of photos to include in the mosiac 


third part of five: Applying filters and colour edition


Part 4 of 5: Cropping at the right aspect ratio, scaling to the right resolution, editing the colours and exporting the result


And finally to organize the nine pics on the final image. You have to open all of then as layers and distribute them carefuly.

Wednesday, 29 January 2025

Gimp 2. Selection and Layers

 Selection tools are designed to select regions from the active layer so you can work on them without affecting the unselected areas. Each tool has its own individual properties, but the selection tools also share a number of options and features in common. 

It is very important that you get familiar with the selection option and the selection menu.


Here you can watch these videos to do a photomontage using the combination of selection tool and layers.

πŸ‘€Keep in mind that when you have different layers and selected areas the effect or the tool applies only to the actived layer and the selected area.πŸ‘€

πŸ‘‰ Gimp 003 photomontage:  πŸ‘ˆ


Watch these videos to help you with the project:

Photomontage 1 of 4


2 of 4


3 of 4


Video 4 of 4

Wednesday, 15 January 2025

The Gimp. Getting started with Gimp: Editing landscape pictures

 This post is to give you the main instructions to start with Gimp

You can find some videos that explain the use of some of some tools tools of the program Gimp2

You will have to instal the program on your home computer. 

Learn first: 

  • How to organize the working area
  • How to find all the tools (tool box)
  • How to prepare the main windows (undo hystory, layers, tool options,...)
  • How to save: where to save, file format (= extension name)
  • How to export: image formats, (=extension name: png, jpg, gif,...)
  • How to use the OneDrive tool to save your projects or images

Video 1: Clone tool, Perspective tool, cropping tool. How to save, how to export and how to add a folder to the program when you are using it as a frequent place to save documents.

I apologize for the quality of the video. It is recorded with Teams and has some cuts on the sound and image


Videos 2 and 3 (the complete tutorial has two parts) :  it explains how to fix inclined pictures using the Rotate tool. Normal and corrective mode. Try both. Save as and export as in different formats (extension name)

part1: 


part 2: save and export